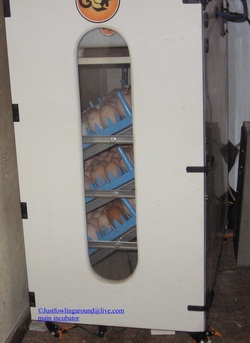
 JFA~~Incubator set for hatching
Hatching Fertile Eggs!
Chicken Coop Chatter©
For some of you that are just starting out or still debating about hatching your own chicks, the following information may help to get you started on the right path. I do know some of you have expressed the desire to hatch fertile eggs, and others of you that have just started hatching your own eggs. At some point those of you ordering live chicks rather than hatching your own, will most likely take that next step, especially if you have your own rooster or know someone that would lend his out for the purpose of obtaining fertile eggs, or if there are "rare" breeds like we raise, that can be immensely difficult to get, unless you find a breeder that has those birds and willing to sell you fertile eggs from their flocks. (We do sell our fertile hatching eggs from all our heritage, rare and unique flocks).
First things first. You need an incubator or a broody hen. Incubator is self-explanatory, but a broody hen is a hen in your flock that you find nesting, that won't budge from the nest. Not all hens are the broody type. In fact some breeders have painstakingly bred the "broodiness" out of some of the breeds. Even so, you will eventually come across one of your hens wanting to hatch her eggs, or even the eggs of other hens. As a side note, Cochins, Silkies and Serama, are typically reliable broodies that are also the best mama hens. So even if you do not raise those breeds, you may wish to consider having one or two if you are interested in hatching from a broody.
If using a broody hen, there's not much to know about that. But you will notice the hen will change positions during the day. She will rarely if ever leave the nest. When she is changing positions, she is actually turning the eggs in the nest. This is to keep the embryo from sticking to the interior membrane of the egg. She will do this no less than twice a day, and usually several times a day. You can move water and feed near the hen to encourage her to eat and keep up her strength, especially if you notice she will not leave the nest. During the final 3 days prior to hatch, she will not move, nor will she leave the nest. She knows not to disturb the chicks in the shell. On that 18th day, the hen has situated the eggs at the optimum position for hatching. By day 21, those chicks should start hatching. It's not an exact science, so it could be either side of the 21 days. So do not be discouraged if on day 21 nothing happens. Do not rush to break the eggs open to see why they didn't hatch. Those eggs could have been fresher or larger eggs and just taking a bit longer to hatch. Once the chicks have hatched Mama hen will be very protective of her babies and may peck at you if you try to get a closer look at the babies. Don't worry, she will settle down when she knows the babies are safe. Even your sweetest little hen, may suddenly turn into a mama bear to protect her offspring. Give her some space, and in a few days she'll have those babies out and about as she's scratching up seeds, bugs and worms for them to eat. At this time she's teaching them to be "self-reliant".
Now, if you want to hatch the eggs and have no broody hens, you will need an incubator. Before you buy one, decide if you want one with circulating air, or still air, automatic or manual, have some idea of how many eggs you want to hatch at a time. There are many incubators available to choose from. There are very small incubators that will hatch 3 or 5 at a time. This won't be suitable if you have a dozen eggs you want to hatch. And remember the incubator is operating for no less than 21 days. If you have a larger capacity incubator, you cannot add eggs to it if you only had a few in it for hatching. Another thing about incubators is that the eggs need to be turned no less than twice a day. You must decide if you have the time and interest to turn those eggs manually of if you want a turning tray that is pre-set to do that task. You also need to know if you want an incubator that is automatic for temperature and humidity or whether you have the time to monitor with a thermometer and hygrometer. So these are things you need to know before making your purchase of an incubator. Some research will be necessary. If you purchase a new incubator there should be a guide book with it. If you make your own or happen onto a used incubator from another source, it may or may not have the manual and you will need to know all of the above information in addition to knowing proper settings. An incubator that is automatic will allow you the freedom to just let it do it's job, a manual incubator will require time from your day and fairly consistent monitoring so temperatures and humidity do not fall too low or register too high.
Optimum temperature for the incubator is 99.5, but the range can be from 99 to 102 degrees. The humidity has to be kept between 30-40% the first 18 days, then increased to between 50 and 65%. If it falls below that, you risk dry hatches (chick sticking to membrane and hard to crack shells). If it goes too high, you risk chicks dying, or essentially drowning in the shells, because there is no air pocket for them to breathe from.
Again, eggs must be turned at least twice a day manually or placed in an automatic egg turner. On day 18, that egg turner is "locked down". In other words, it is turned off, so it is no longer turning. (This applies to manual turning as well, you no longer turn those eggs from day 18 through hatch.) The turner is kept off through the end of the hatch. On day 18 you can carefully turn the eggs onto their side, it must be done very carefully so the chick is not disturbed in the shell. Now, you sit and wait for those eggs to start "pipping", "peeping", "rocking and rolling" and then hatching. Some may "pip" and then take many hours before they fully hatch. Don't panic. It's hard work for chicks to hatch out and they will tire out. They will rest or even sleep until they start working at breaking through the shell once again.
When a chick hatches, you can leave it in the incubator to dry off before placing in a pre-heated brooder. Chicks do not need food or water for the first couple of days. They are born with their own food supply to get them through the first few days. However, if you move them to the brooder, having the food and water source already placed in there encourages them to try it out. Have your brooder ready and pre-heated before the babies hatch.
When all the babies have hatched and transported to the brooder, clean and sterilize your incubator to have it ready for your next incubating session.
One very important note: IF you happen to lose power, which is possible at any time during incubation period; wrap the incubator in a heavy towel, blanket or survival blanket to maintain as much of the heat as possible until power is restored. We have experienced power outages during incubation, so it is something to be aware of. One thing to watch for is to make sure with the auto turners, that they do NOT come back on if the power outage is in the final three days of lockdown. That will kill the majority of your hatch. Be sure when power is restored, that you remove the insulating materials you've used as soon as optimum temperature has been maintained. In addition, keep your incubator in a location where there are no drafts. Drafts can alter your temperature and humidity readings, thus alter your hatch rates.
Important things to remember: .When you receive your fertile hatching eggs, allow to sit undisturbed for 24 hours. THE RESTING PERIOD IS VITAL TO ALLOW THE ALBUMEN TO SETTLE BEFORE INCUBATING 1. Eggs should be placed in the trays with the pointed end down (the air sack) Turn the eggs at least twice a day up to 18 days from the time you placed the eggs in the incubator. 2. Keep the incubator at 99-102 degrees, with optimum at 99.5. (out of a draft) 3. Keep the humidity between 30 and 45% at all times through the first 18 days of the incubating period and increased to 50-65% the last three days. 4. Prepare the brooder ahead of hatch. 5. Wait, Anticipate, Worry and Jump for joy when you hear that first little peep. Whatever you do, enjoy the experience and reap the rewards of your success.
Brooders:
When preparing the brooder, use whatever bedding you choose or is available to you. Some use Cedar shavings, pine shavings, straw etc. There's no right or wrong to the natural bedding used. Have clean waterers and feeders, and make sure they are accessible to the chicks. Also make sure the waterer is not too deep or chicks could drown in them. The best feeders are ones that chicks cannot walk in. This is necessary to keep bacteria down. Change the water daily if not more often depending on how much of the feed or droppings may be getting into it. We give our chicks the best "starter" food available. Do not scrimp on their feed. They need a good healthy start. We also put 1 T. Pure Apple Cider vinegar in a gallon of water. This helps with their delicate digestive systems. Make certain your heat lamps are far enough above the brooder so it is not too hot on the babies. You will notice if the babies move away from the heat lamp that it is too warm. Place a thermometer in the brooder so you can keep track of the temperature. Also make certain that your heat lamp is completely secure, so it is not apt to fall into the brooder. This is not only unsafe for the chicks but unsafe for you as a fire hazard.
Anything can work for a brooder. From a large plastic container, crate, box or commercial brooder. The important thing is that it be easy to clean and easy to be kept clean. We have used a variety of containers as brooders, including what I listed. Some people use portable tubs, child swimming pools and even bathtubs.
You can build your own wooden brooder, but if you do so, make sure it has a removable litter tray for ease of cleaning. Do NOT use teflon coated lights in your brooders or chicken coops. Apparently there is a toxicity emitted when these lights get hot and can kill your chicks or chickens.
Make sure the chicks always have fresh water and good quality starter feed. Monitor them frequently to make sure they are active and that none are being trampled. Keep them in the brooder until their true feathers start coming in. Keep the heat lamp on until they have their true feathers. At this time you can gradually move the heat lamp farther away until they are only in room temperature. If the weather is mild, they can be moved to a protected outdoor brooder when they are fully feathered. This could be 4 to 6 weeks, depending on the breed.
Important to remember: !. Keep the brooder clean. Change the litter at least once a day, or more if you see that it is wet or full of droppings. The more chicks in the brooder, the more often it will need cleaning. 2. Keep clean food and water available to the chicks at all times. 3. Make sure the heat lamp is secure and far enough away from the chicks that they are not getting too warm. Dehydration can be a very serious problem if not monitored. 4. Monitor the temperature of the brooder. 5. When handling chicks, be sure to wash thoroughly each time. This is especially true for children. You do not want chicks transferring illness to you, nor do you want to transfer illness to your chicks. Good hygiene for you and your chicks is essential.
When you order our fertile hatching eggs the instructions below, are the exact copy of the instructions we send with each order. Adhering to these instructions will help you achieve the best possible results. Do NOT expect 100% percent hatch, even from your own flock. There's a reason it is said, *Do not count your chicks before they hatch*. There are so many variables and reasons a chick doesn't hatch that is completely out of our control or yours. IF you get 100% hatch that is a bonus. A 50% hatch is considered a good hatch. All of our eggs are tested continually for fertility and we hatch hundreds annually.
HATCHING INSTRUCTIONS (included with every order)
IMPORTANT: Your feedback is very important to us and important to maintaining our records. Please leave positive feedback as soon as your package arrives, not after your hatch. We cannot control the variables with your hatch but we can package with livability in mind. Thank you for your prompt and positive feedback.
Good luck with your hatch!! Thank you for your business!!
Care of fertile eggs:
1.When you receive your fertile hatching eggs, allow to sit undisturbed for 24 hours.
2. Store eggs in a cool-humid storage area.
3. Store the eggs with the small end pointed downward.
4. Alter egg position periodically if not incubating within 4-6 days. Turn the eggs to a new position once daily until placing in the incubator.
5. Hatchability holds reasonably well up to seven days, but declines rapidly afterward.
6. Allow cool eggs to warm slowly to room temperature before placing in the
incubator. Abrupt warming from 55 degrees to 100 degrees causes moisture
condensation on the egg shell that leads to disease and reduced hatches.
Incubating Conditions
Poor results are most commonly produced with improper control of temperature and/or humidity. Improper control means that the temperature or humidity is too high or too low for a sufficient length of time that it interferes with the normal growth and development of the embryo. Poor results also occur from improper ventilation, egg turning and sanitation of the machines or eggs.
Obtain the best hatch by keeping the temperature at 100 degrees F. throughout the entire incubation period when using a forced-air incubator. Minor fluctuations (less than ½ degree) above or below 100 degrees are tolerated, but do not let the temperatures vary more than a total of 1 degree. Prolonged periods of high or low temperatures will alter hatching success. High temperatures are especially serious.
A forced-air incubator that is too warm tends to produce early hatches. One that runs consistently cooler tends to produce late hatches. In both cases the total chicks hatched will be reduced.
Check the thermometer! Is it accurate? An error of one degree for 21 days can seriously interfere with embryonic growth.
Check the incubator thermometer's accuracy by placing the bulb next to the bulb of a clinical (the kind used to measure body temperature) or good laboratory thermometer. Hold both under lukewarm tap water and compare the readings.
Compensate for any variation of the incubating thermometer by increasing or decreasing by the amount of variation. A thermometer with a split or gapped mercury column will not give an accurate reading, discard it.
Humidity is carefully controlled to prevent unnecessary loss of egg moisture. The relative humidity in the incubator between setting and three days prior to hatching should remain at 30-40% or 84-86 degree F., wet-bulb. When hatching, the humidity is increased to 55%-65% relative humidity.
Eggs must be turned at least 4-6 times daily during the incubation period. Do not turn eggs during the last three days before hatching. The embryos are moving into hatching position and need no turning. Keep the incubator closed during hatching to maintain proper temperature and humidity. The air vents should be almost fully open during the latter stages of hatching.
To assure the eggs are all turned when hand turning, mark an X on one side, O on the other.
The eggs are initially set in the incubator with the large end up or horizontally with the large end slightly elevated. This enables the embryo to remain oriented in a proper position for hatching. Never set eggs with the small end upward.
Species: Chicken
Incubation Period(days) 21 days
Temp(F.)¹ 100 degrees F.
Humidity(F.)² 30-40% first 18 days (no higher)
Humidity: 55-65% last 3 days (no higher)
Do not turn after day 18
Chicken Coop Chatter© All rights reserved 2011-2018
 RSS Feed